This tutorial describes the process to create a Silverlight Desktop module package. A Silverlight Desktop module can easily be distributed and installed by non technical end users to add functionality and enhance their Silverlight Desktop installations.
The process to install a Silverlight Desktop module is covered at this link.
This tutorial will demonstrate creating a Silverlight Desktop module package for the Silverlight Notepad module (creating the Silverlight Notepad module is covered in the tutorial at this link).

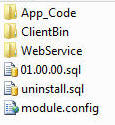
After the Silverlight Notepad module is created, the highlighted files in the picture above show the files that comprise the module. These files will be placed in the module package. Note that the source files for SilverlightNotepad Silverlight project are not considered part of the module. The relevant code from the SilverlightNotepad Silverlight project is compiled in the SilverlightNotepad.xap file that is in the ClientBin directory.

Create a temporary directory on the hard drive (outside of Visual Studio). Create folders in this directory so that the files can be placed in their proper relative position. Place the files in their proper directory.

For example, the SilverlightNotepadWebservice.cs file should be placed in the \App_Code\Webservice directory.
When the Silverlight Desktop module is installed, the Silverlight Desktop installer will look for .sql scripts that have a version number that is greater than the current version number for the module and run them in order. If the module has never been installed it's version number is 0.

Create a text file named 01.00.00.sql and place it in the root of the temporary directory with the following contents:
/****** Object: Table [dbo].[SilverlightNotepad]
******/
IF NOT EXISTS (SELECT * FROM dbo.sysobjects WHERE id = OBJECT_ID(N'[dbo].[SilverlightNotepad]')
AND OBJECTPROPERTY(id, N'IsUserTable') = 1)
BEGIN
CREATE TABLE [dbo].[SilverlightNotepad](
[NoteID] [int] IDENTITY(1,1) NOT NULL,
[UserName] [nvarchar](50) NOT NULL,
[IPAddress] [nvarchar](50) NOT NULL,
[Note] [nvarchar](100) NULL,
CONSTRAINT [PK_SilverlightNotepad] PRIMARY KEY CLUSTERED
(
[NoteID] ASC
)WITH (PAD_INDEX = OFF, STATISTICS_NORECOMPUTE = OFF, IGNORE_DUP_KEY = OFF,
ALLOW_ROW_LOCKS = ON,
ALLOW_PAGE_LOCKS = ON) ON [PRIMARY]
) ON [PRIMARY]
END
This will create the tables the module requires in SQL server.
The Silverlight Desktop installer will also look for a file called uninstall.sql. The contents of this file will be stored in the database and it's script will be run if the module is uninstalled.

Create a text file named uninstall.sql and place it in the root of the temporary directory with the following contents:
IF EXISTS (SELECT * FROM dbo.sysobjects WHERE id =
OBJECT_ID(N'[dbo].[SilverlightNotepad]') AND OBJECTPROPERTY(id, N'IsUserTable')
= 1)
BEGIN
DROP TABLE [dbo].[SilverlightNotepad]
END
This will remove the SilverlightNotepad table if the module is uninstalled.
The final file that needs to be created is the module.config file.

Create a text file named module.config and place it in the root of the temporary directory with the following contents:
<SilverlightDesktop>
<configversion>1.0</configversion>
<configtype>Module</configtype>
<modulename>Silverlight Notepad</modulename>
<description>Allows users to save notes</description>
<assembly>SilverlightNotepad.xap</assembly>
<class>SilverlightNotepad.Page</class>
<icon>null</icon>
<role>Any</role>
<windowsize>50</windowsize>
<version>01.00.00</version>
<removefiles>
</removefiles>
</SilverlightDesktop>
The module.config file has the following format:
<removefiles>
<file>
<name>App_Code\HelloWorld1.cs</name>
</file>
<file>
<name>App_Code\HelloWorld2.cs</name>
</file>
</removefiles>
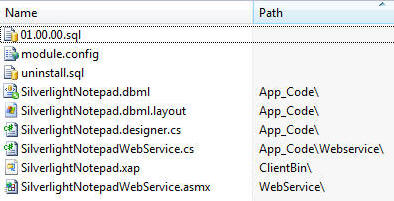
Zip up the files in the temporary directory so the .zip file resembles this:

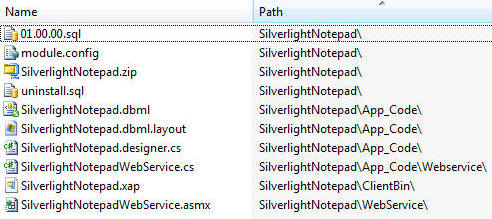
NOT this:

![]()
The .zip file can now be uploaded into a Silverlight Desktop website by the Super user. The module can be upgraded by simply changing the version number in the module.config file and uploading a newer module .zip file.