|
|
|
Creating the Development environment: |
|
|||
| At this point you want to have
DNN installed and working. You should only use a development server. If
you attempt to develop a module on a production server you will
undoubtedly mess up your production instillation of DNN and that is very
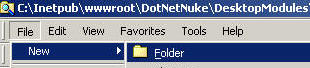
upsetting! 1. Once you have DNN up and running, use the file manager (Windows Explorer) to locate the "DesktopModules" folder in the DNN directory (usually located at "C:\Inetpub\ wwwroot\ DotNetNuke\ DesktopModules"). 2. Create a folder in that directory and name it "ShowMessages" 3. Open notepad and paste the following code in it and save it as "ShowMessage.ascx" in the "ShowMessages" directory you just created.
4. Open notepad and paste the following code in it and save it as "WriteMessage.ascx" in the "ShowMessages" directory.
5. Open notepad and paste the following code in it and save it as "ImportantMessages.vb" in the "ShowMessages" directory. You can download a copy of the files here.
| ||||
|
|
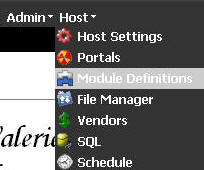
Now that you have put the files into DNN you have to tell DNN that
the files are installed. First log in using the master DNN administrator
account (without this you will not be able to see the "HOST"
tab). Select HOST then MODULE DEFINITIONS |
|||
|
|
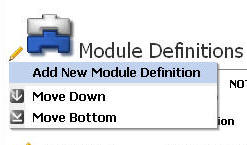
On the next screen select ADD NEW MODULE DEFINITION | |||
|
|
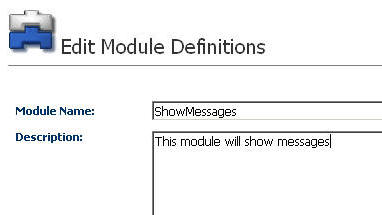
On the next screen enter "ShowMessages" for the module name and "This module will show messages" for description. Click the UPDATE button at the bottom of the page. | |||
|
|
The DEFINITIONS box will appear at the bottom of the screen. Type in "Show Message" and click ADD DEFINITION. | |||
|
|
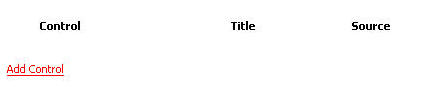
The control section will appear. Click ADD CONTROL. | |||
|
|
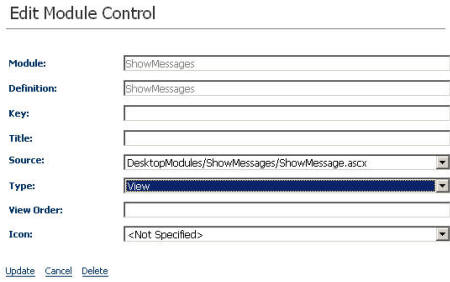
The EDIT MODULE CONTROL box will appear. Use the drop-down box to select "DesktopModules/ShowMessages/ShowMessage.ascx" for SOURCE and select "view" for TYPE. | |||
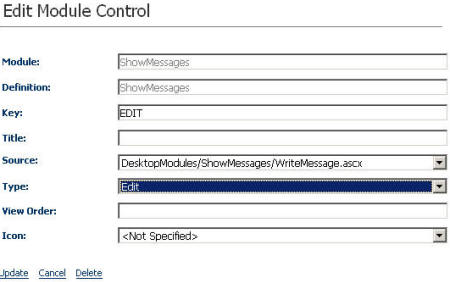 |
Click ADD CONTROL again. The EDIT MODULE CONTROL box will appear. Use the drop-down box to select "DesktopModules/ShowMessages/WriteMessage.ascx" for SOURCE and select "Edit" for TYPE. Enter "EDIT" for KEY. Click UPDATE. | |||
| Click the MODULE DEFINITION Tab. | ||||
| Next to TAB ADMIN in the upper left hand corner, click ADD |
|
|||
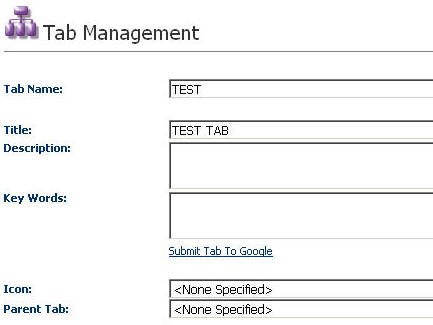
| On the Tab Management screen, enter "TEST" for TAB NAME and "TEST TAB" for TITLE. Select "<None Specified>" for PARENT TAB. Click UPDATE at the bottom of the page. |
|
|||
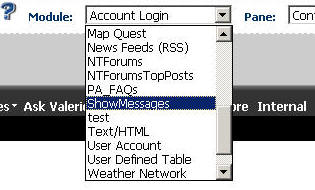
| Now from the MODULE drop down select "ShowMessages" |
|
|||
| Click the ADD button |
|
|||
| The show messages module will now appear on the page. |
|
|||
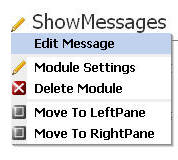 |
Hover the mouse pointer over the pencil icon in the upper left-hand corner of the module. When the fly-out menu appears select "Edit Message". | |||
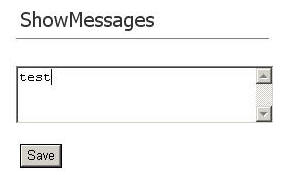 |
The edit control will appear. Type in "test" and click SAVE. | |||
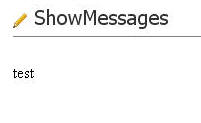 |
The message will appear. | |||
The development environment is complete. |
||||
|
|
2 of 5 |
|
DotNetNuke® is a registered trademark of Perpetual Motion Interactive Systems Inc.